MQ引言
什么是MQ
MQ(Message Quene) : 翻译为 消息队列,通过典型的 生产者和消费者模型,生产者不断向消息队列中生产消息,消费者不断的从队列中获取消息。因为消息的生产和消费都是异步的,而且只关心消息的发送和接收,没有业务逻辑的侵入,轻松的实现系统间解耦。别名为 消息中间件 通过利用高效可靠的消息传递机制进行平台无关的数据交流,并基于数据通信来进行分布式系统的集成。
MQ有哪些
当今市面上有很多主流的消息中间件,如老牌的ActiveMQ、RabbitMQ,炙手可热的Kafka,阿里巴巴自主开发RocketMQ等。
不同MQ特点
# 1.ActiveMQ
		ActiveMQ 是Apache出品,最流行的,能力强劲的开源消息总线。它是一个完全支持JMS规范的的消息中间件。丰富的API,多种集群架构模式让ActiveMQ在业界成为老牌的消息中间件,在中小型企业颇受欢迎!

# 2.Kafka
		Kafka是LinkedIn开源的分布式发布-订阅消息系统,目前归属于Apache顶级项目。Kafka主要特点是基于Pull的模式来处理消息消费,
		追求高吞吐量,一开始的目的就是用于日志收集和传输。0.8版本开始支持复制,不支持事务,对消息的重复、丢失、错误没有严格要求,
		适合产生大量数据的互联网服务的数据收集业务。

# 3.RocketMQ
		RocketMQ是阿里开源的消息中间件,它是纯Java开发,具有高吞吐量、高可用性、适合大规模分布式系统应用的特点。RocketMQ思路起
		源于Kafka,但并不是Kafka的一个Copy,它对消息的可靠传输及事务性做了优化,目前在阿里集团被广泛应用于交易、充值、流计算、消
		息推送、日志流式处理、binglog分发等场景。

# 4.RabbitMQ
		RabbitMQ是使用Erlang语言开发的开源消息队列系统,基于AMQP协议来实现。AMQP的主要特征是面向消息、队列、路由(包括点对点和
		发布/订阅)、可靠性、安全。AMQP协议更多用在企业系统内对数据一致性、稳定性和可靠性要求很高的场景,对性能和吞吐量的要求还在
		其次。
RabbitMQ比Kafka可靠,Kafka更适合IO高吞吐的处理,一般应用在大数据日志处理或对实时性(少量延迟),可靠性(少量丢数据)要求稍低的场景使用,比如ELK日志收集。
RabbitMQ 的引言
RabbitMQ
基于
AMQP协议,erlang语言开发,是部署最广泛的开源消息中间件,是最受欢迎的开源消息中间件之一。
# AMQP 协议
		AMQP(advanced message queuing protocol)`在2003年时被提出,最早用于解决金融领不同平台之间的消息传递交互问题。顾名思义,AMQP是一种协议,更准确的说是一种binary wire-level protocol(链接协议)。这是其和JMS的本质差别,AMQP不从API层进行限定,而是直接定义网络交换的数据格式。这使得实现了AMQP的provider天然性就是跨平台的。以下是AMQP协议模型:
RabbitMQ 的安装
下载
官网下载地址: https://www.rabbitmq.com/download.html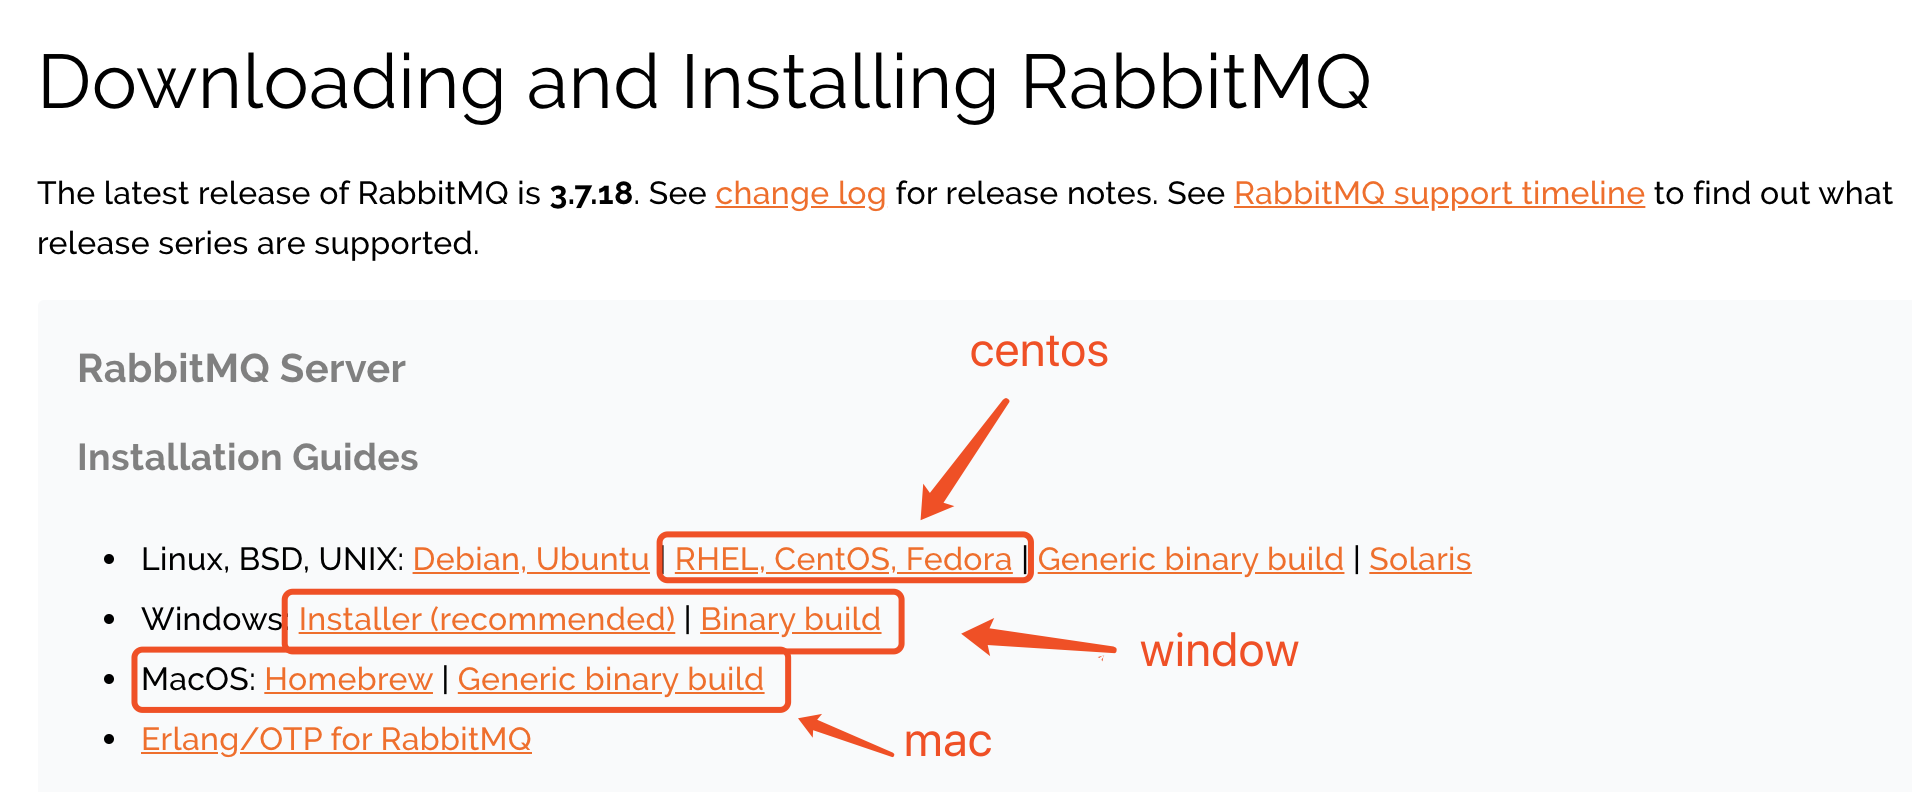
最新版本: 3.7.18
下载的安装包

注意:这里的安装包是centos7安装的包
安装步骤
# 1.将rabbitmq安装包上传到linux系统中
	erlang-22.0.7-1.el7.x86_64.rpm
	rabbitmq-server-3.7.18-1.el7.noarch.rpm

# 2.安装Erlang依赖包
	rpm -ivh erlang-22.0.7-1.el7.x86_64.rpm

# 3.安装RabbitMQ安装包(需要联网)
	yum install -y rabbitmq-server-3.7.18-1.el7.noarch.rpm
		注意:默认安装完成后配置文件模板在:/usr/share/doc/rabbitmq-server-3.7.18/rabbitmq.config.example目录中,需要
				将配置文件复制到/etc/rabbitmq/目录中,并修改名称为rabbitmq.config
# 4.复制配置文件
	cp /usr/share/doc/rabbitmq-server-3.7.18/rabbitmq.config.example /etc/rabbitmq/rabbitmq.config

# 5.查看配置文件位置
	ls /etc/rabbitmq/rabbitmq.config

# 6.修改配置文件(参见下图:)
vim /etc/rabbitmq/rabbitmq.config 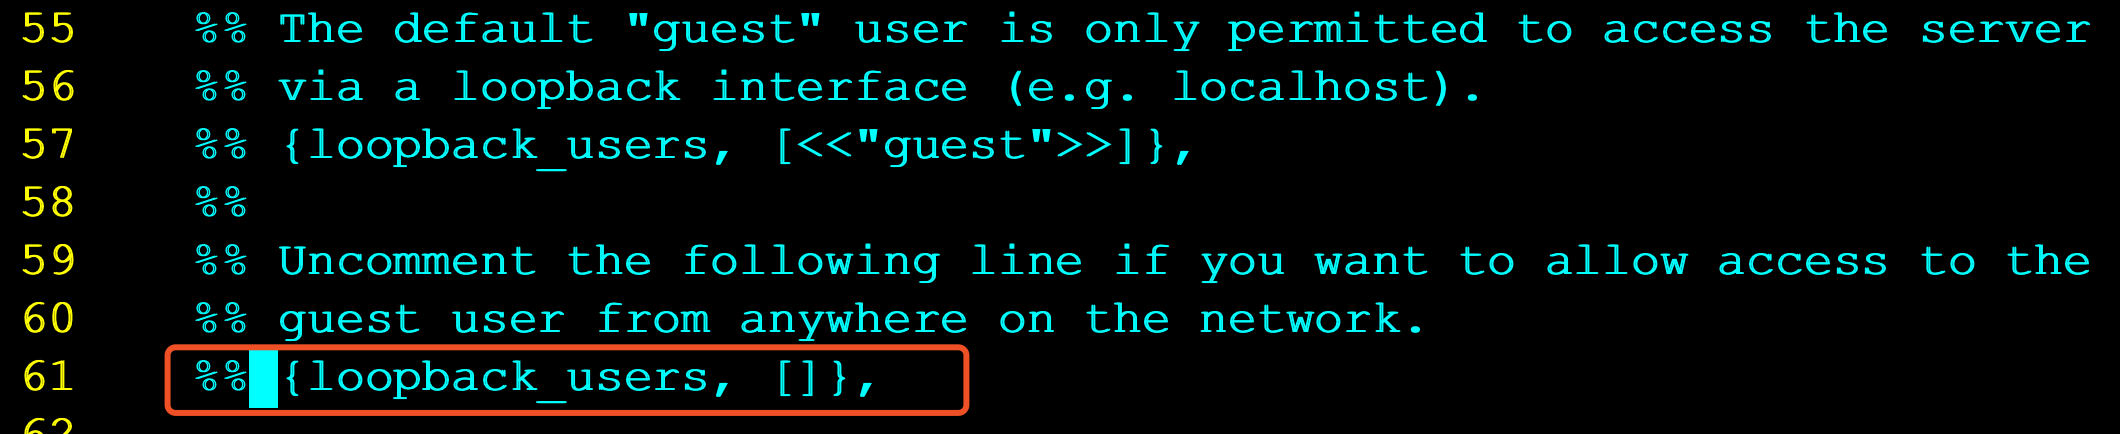
将上图中配置文件中红色部分去掉%%,以及最后的,逗号 修改为下图:

如果不修改这个会因为权限问题无法登的,这个就是开启来宾账号guest的
# 7.执行如下命令,启动rabbitmq中的插件管理
	rabbitmq-plugins enable rabbitmq_management

	出现如下说明:
[root@shiyaochang home]# rabbitmq-plugins enable rabbitmq_management
Enabling plugins on node rabbit@shiyaochang:
rabbitmq_management
The following plugins have been configured:
  rabbitmq_management
  rabbitmq_management_agent
  rabbitmq_web_dispatch
Applying plugin configuration to rabbit@shiyaochang...
The following plugins have been enabled:
  rabbitmq_management
  rabbitmq_management_agent
  rabbitmq_web_dispatch

set 3 plugins.
Offline change; changes will take effect at broker restart.


# 8.启动RabbitMQ的服务
	systemctl start rabbitmq-server
	systemctl restart rabbitmq-server
	systemctl stop rabbitmq-server


# 9.查看服务状态(见下图:)
	systemctl status rabbitmq-server
[root@shiyaochang home]# systemctl status rabbitmq-server
● rabbitmq-server.service - RabbitMQ broker
   Loaded: loaded (/usr/lib/systemd/system/rabbitmq-server.service; disabled; vendor preset: disabled)
   Active: active (running) since Sat 2023-07-29 17:06:50 CST; 10s ago
 Main PID: 22472 (beam.smp)
   Status: "Initialized"
   CGroup: /system.slice/rabbitmq-server.service
           ├─22472 /usr/lib64/erlang/erts-10.4.4/bin/beam.smp -W w -A 64 -MBas ageffcbf -MHas ageffcbf -MBlmbcs 512 -MHlmbcs 512 -MMmcs 30 -P 1048576 -t 5000000...
           ├─22800 erl_child_setup 32768
           ├─22825 inet_gethost 4
           └─22826 inet_gethost 4
# 10.关闭防火墙服务(或者开放端口Mq默认端口:15172,某些服务器还有配置安全组)
1.关闭防火墙:
systemctl disable firewalld
Removed symlink /etc/systemd/system/multi-user.target.wants/firewalld.service.
Removed symlink /etc/systemd/system/dbus-org.fedoraproject.FirewallD1.service.
systemctl stop firewalld


2.开放端口
[root@shiyaochang home]# firewall-cmd --zone=public --add-port=15672/tcp --permanent
success
[root@shiyaochang home]# firewall-cmd --list-ports  # 只看端口信息
9090/tcp 80/tcp
[root@shiyaochang home]# systemctl restart firewalld.service  #重启防火墙
[root@shiyaochang home]# firewall-cmd --list-ports  # 只看端口信息
9090/tcp 80/tcp 15672/tcp
[root@shiyaochang home]#

# 11.访问web管理界面
http://10.15.0.8:15672/ 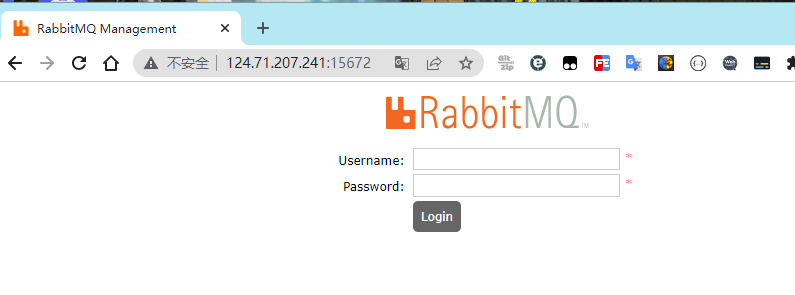
# 12.来宾账号
	username:  guest
	password:  guest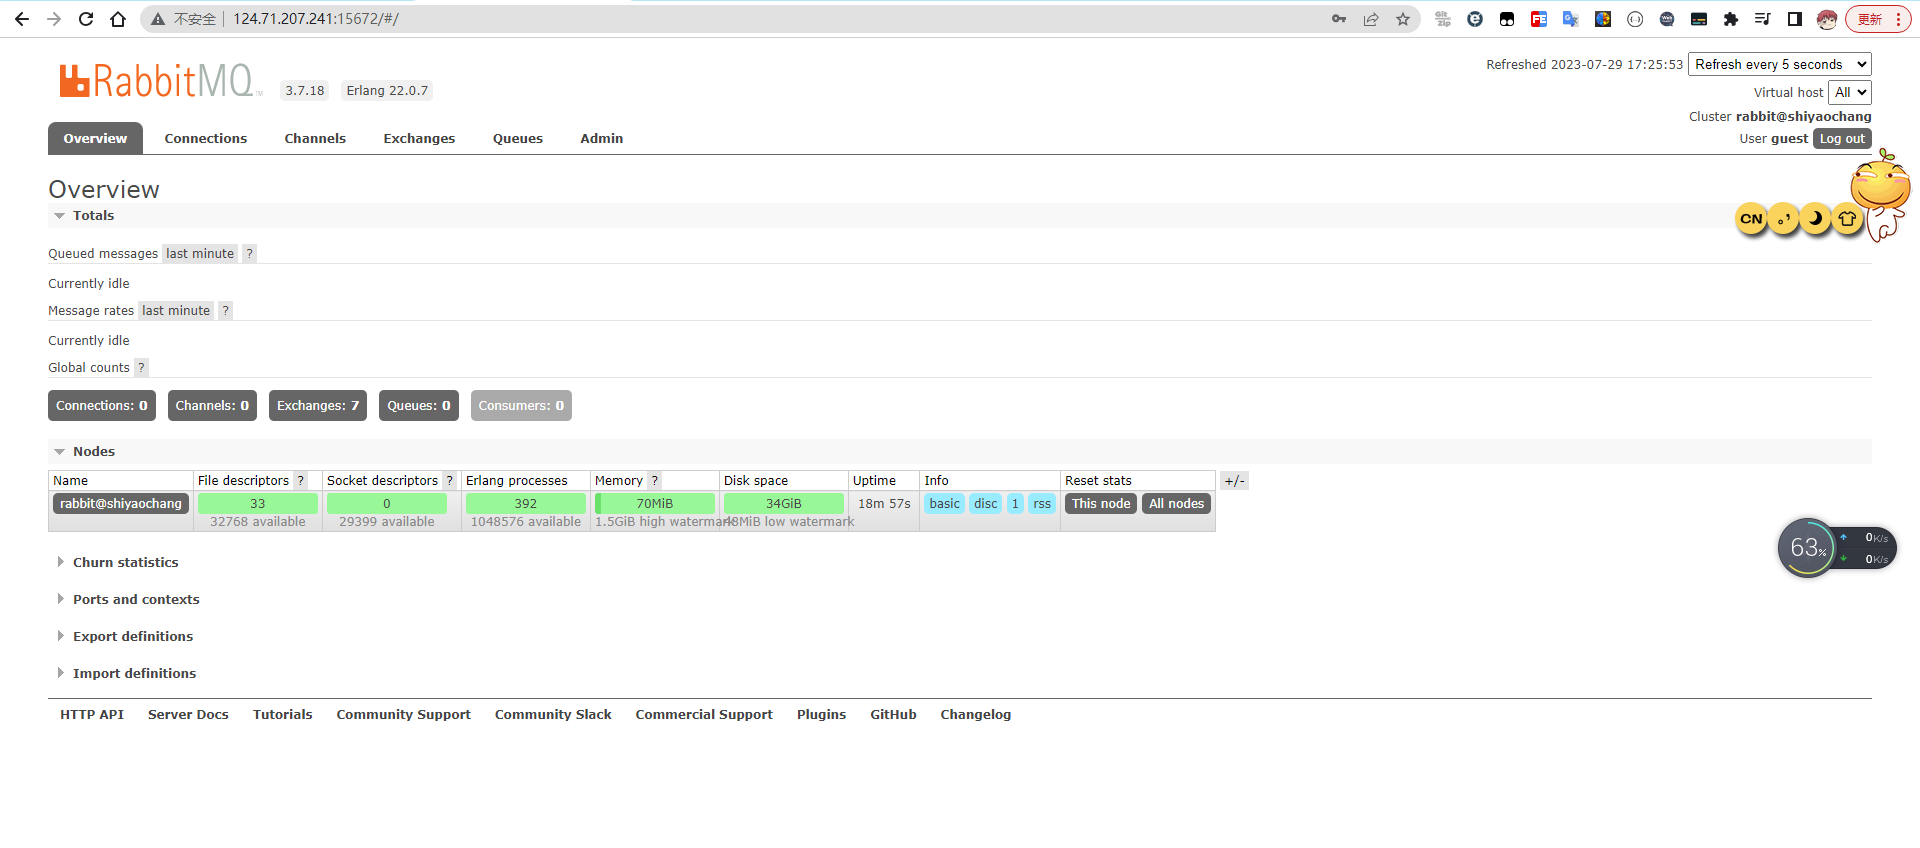
RabiitMQ 配置
RabbitMQ 管理命令行
# 1.服务启动相关
	systemctl start|restart|stop|status rabbitmq-server

# 2.管理命令行  用来在不使用web管理界面情况下命令操作RabbitMQ
	rabbitmqctl  help  可以查看更多命令

# 3.插件管理命令行
	rabbitmq-plugins enable|list|disable
web管理界面介绍
connections:无论生产者还是消费者,都需要与RabbitMQ建立连接后才可以完成消息的生产和消费,在这里可以查看连接情况channels:通道,建立连接后,会形成通道,消息的投递获取依赖通道。Exchanges:交换机,用来实现消息的路由Queues:队列,即消息队列,消息存放在队列中,等待消费,消费后被移除队列。
Admin用户和虚拟主机管理
添加用户
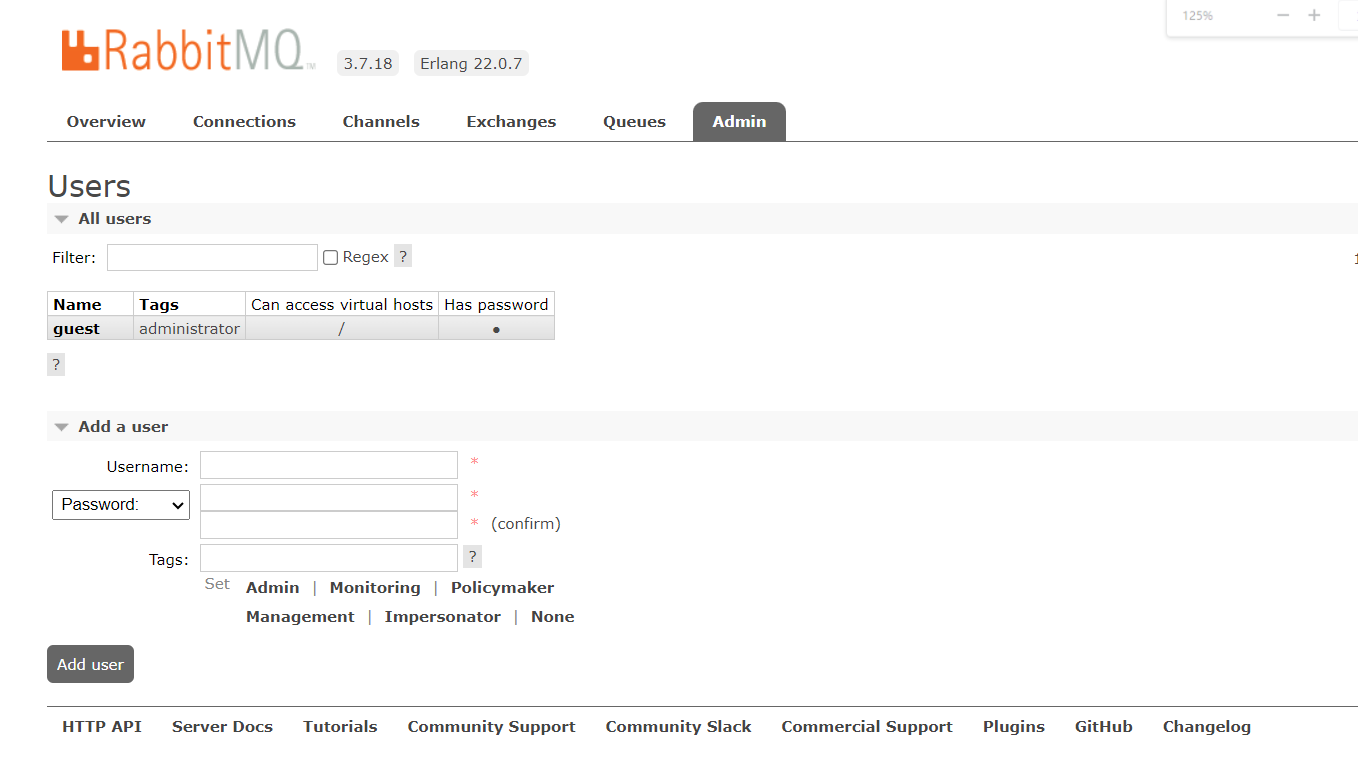
添加用户的Tags选项,其实是指定用户的角色,可选的有以下几个:
超级管理员(administrator)可登陆管理控制台,可查看所有的信息,并且可以对用户,策略(policy)进行操作。
监控者(monitoring)可登陆管理控制台,同时可以查看rabbitmq节点的相关信息(进程数,内存使用情况,磁盘使用情况等)
策略制定者(policymaker)可登陆管理控制台, 同时可以对policy进行管理。但无法查看节点的相关信息(上图红框标识的部分)。
普通管理者(management)仅可登陆管理控制台,无法看到节点信息,也无法对策略进行管理。
其他无法登陆管理控制台,通常就是普通的生产者和消费者。
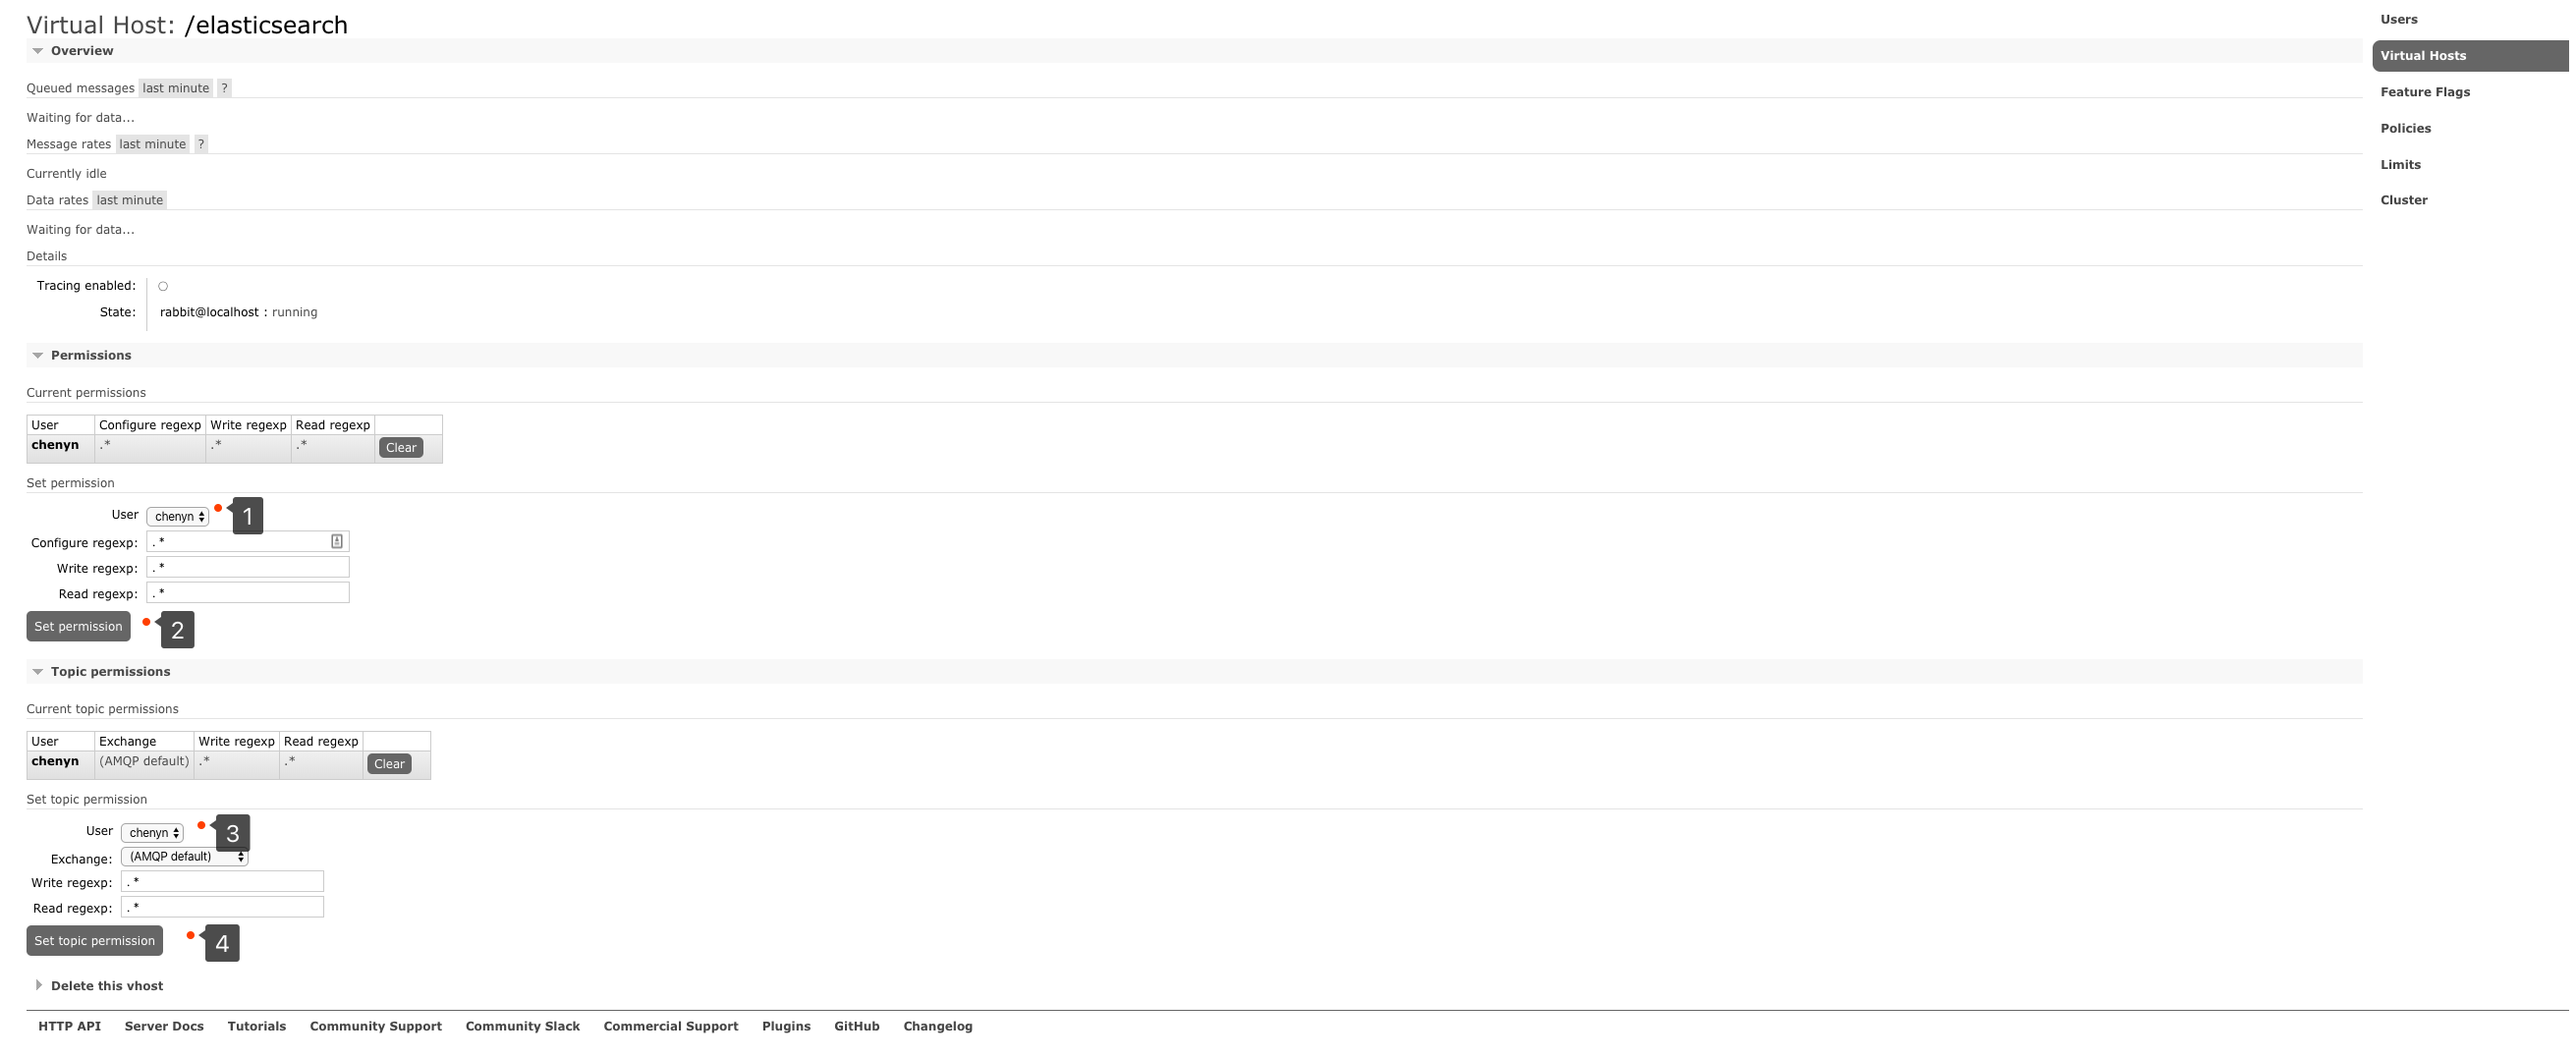
创建虚拟主机
虚拟主机
为了让各个用户可以互不干扰的工作,RabbitMQ添加了虚拟主机(Virtual Hosts)的概念。其实就是一个独立的访问路径,不同用户使用不同路径,各自有自己的队列、交换机,互相不会影响。

绑定虚拟主机和用户
创建好虚拟主机,我们还要给用户添加访问权限:
点击添加好的虚拟主机:

进入虚拟机设置界面:
RabbitMQ 的第一个程序
AMQP协议的回顾

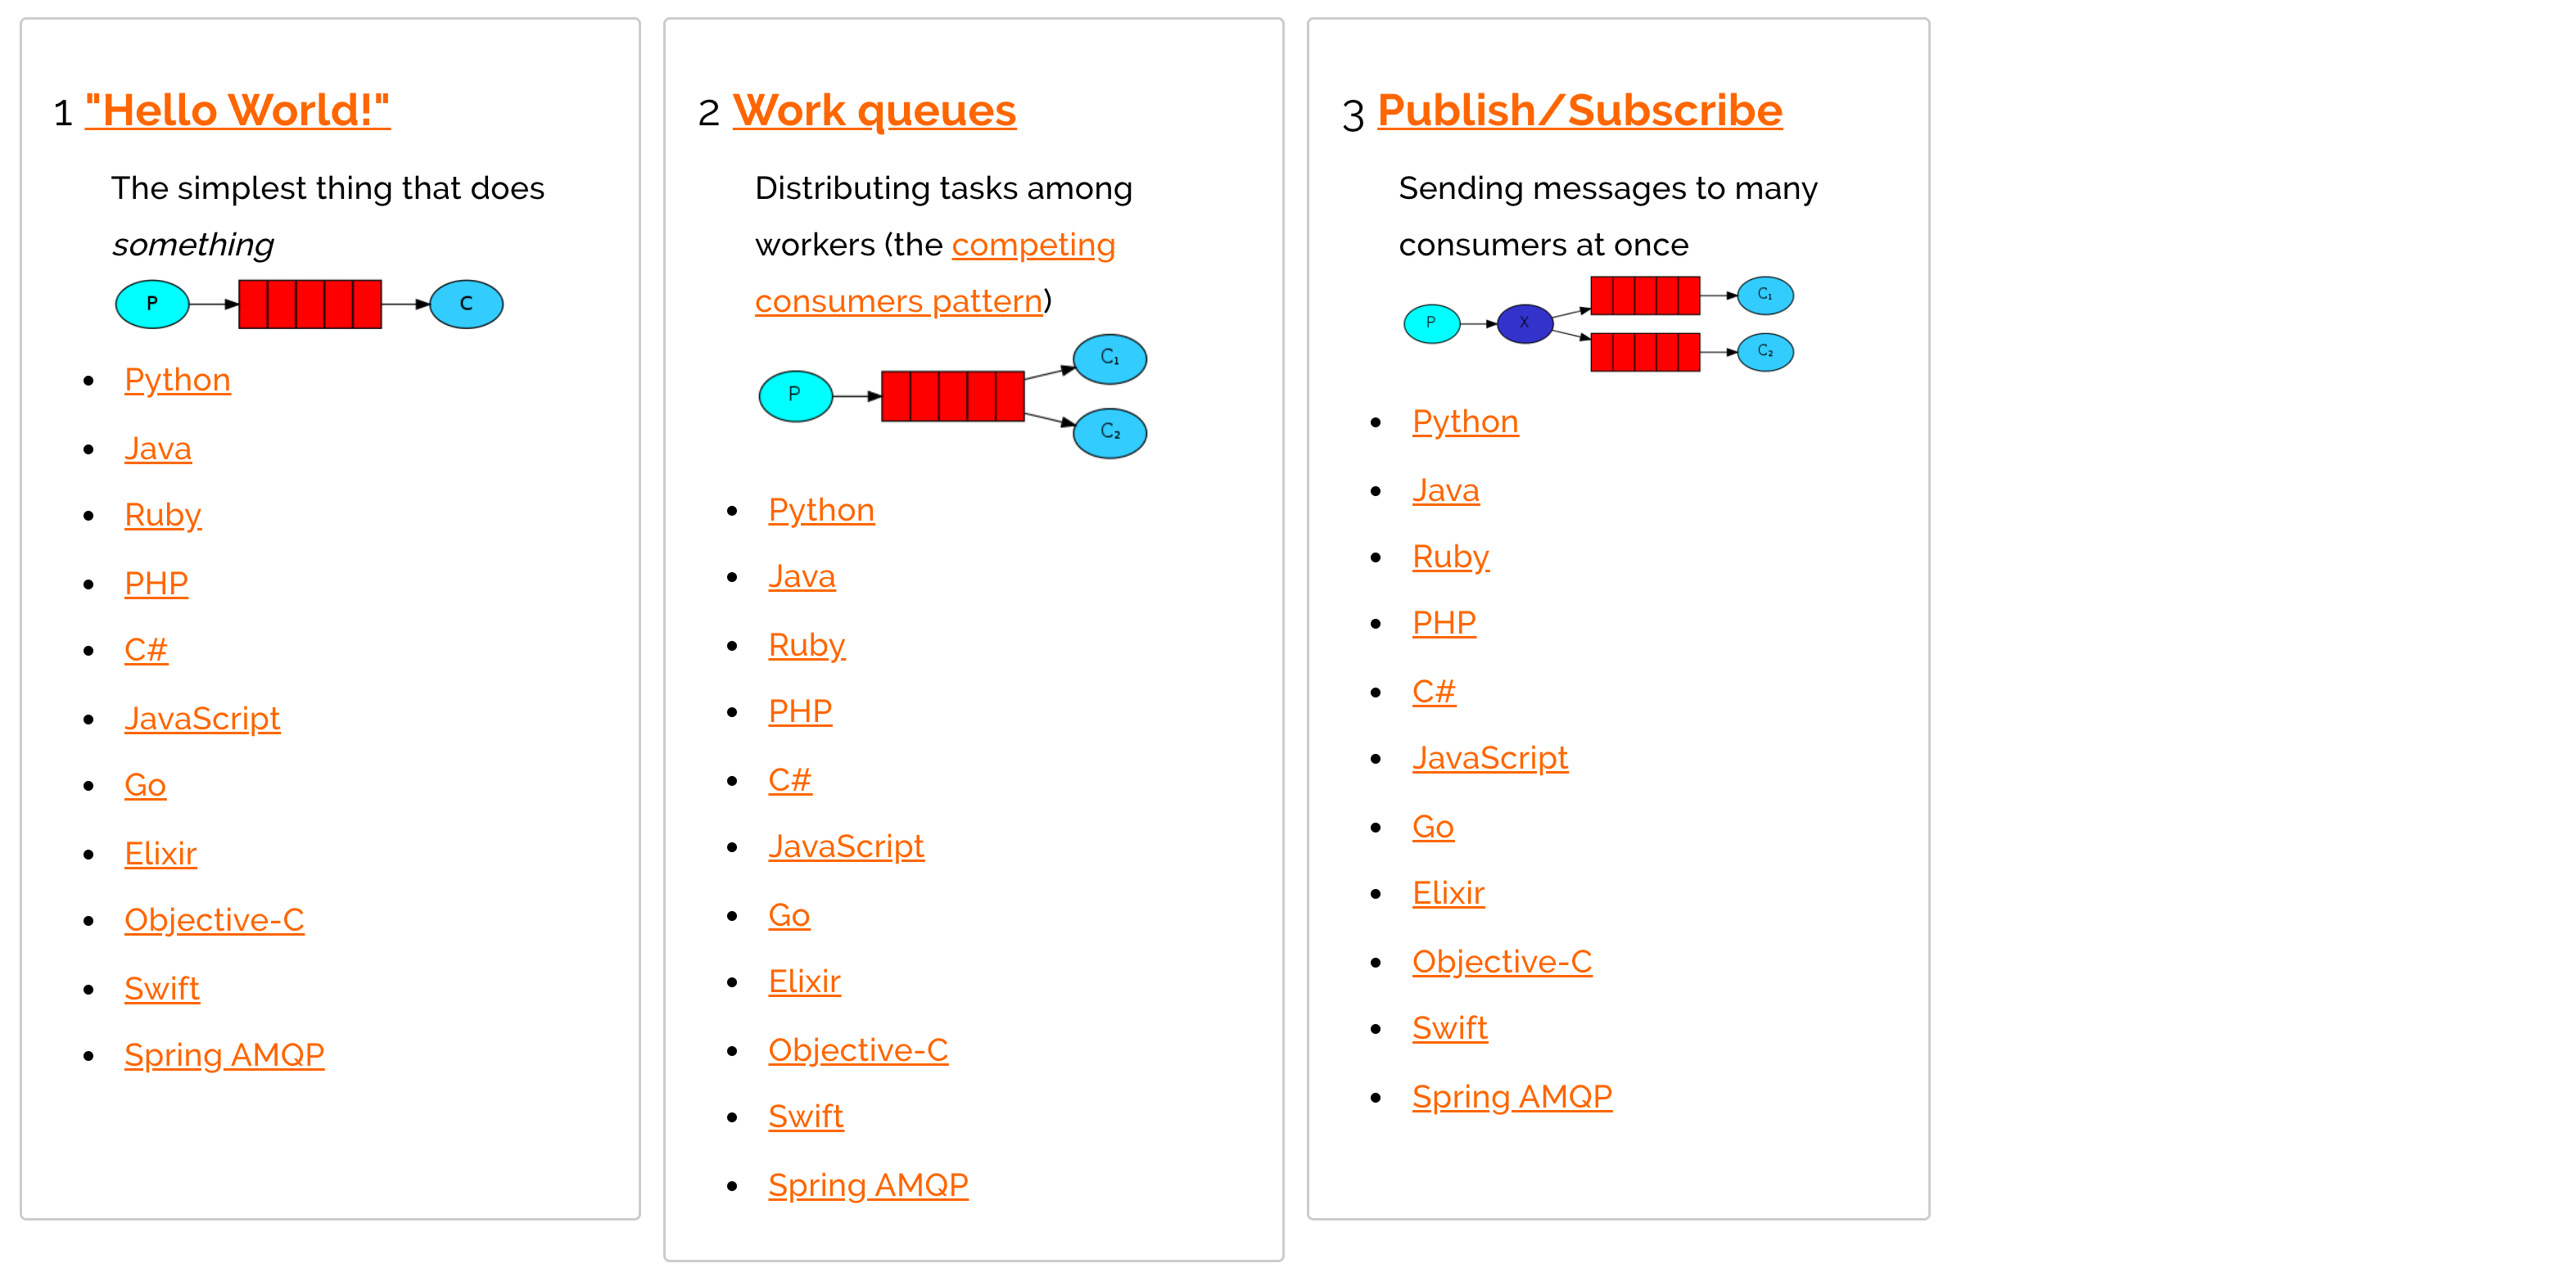
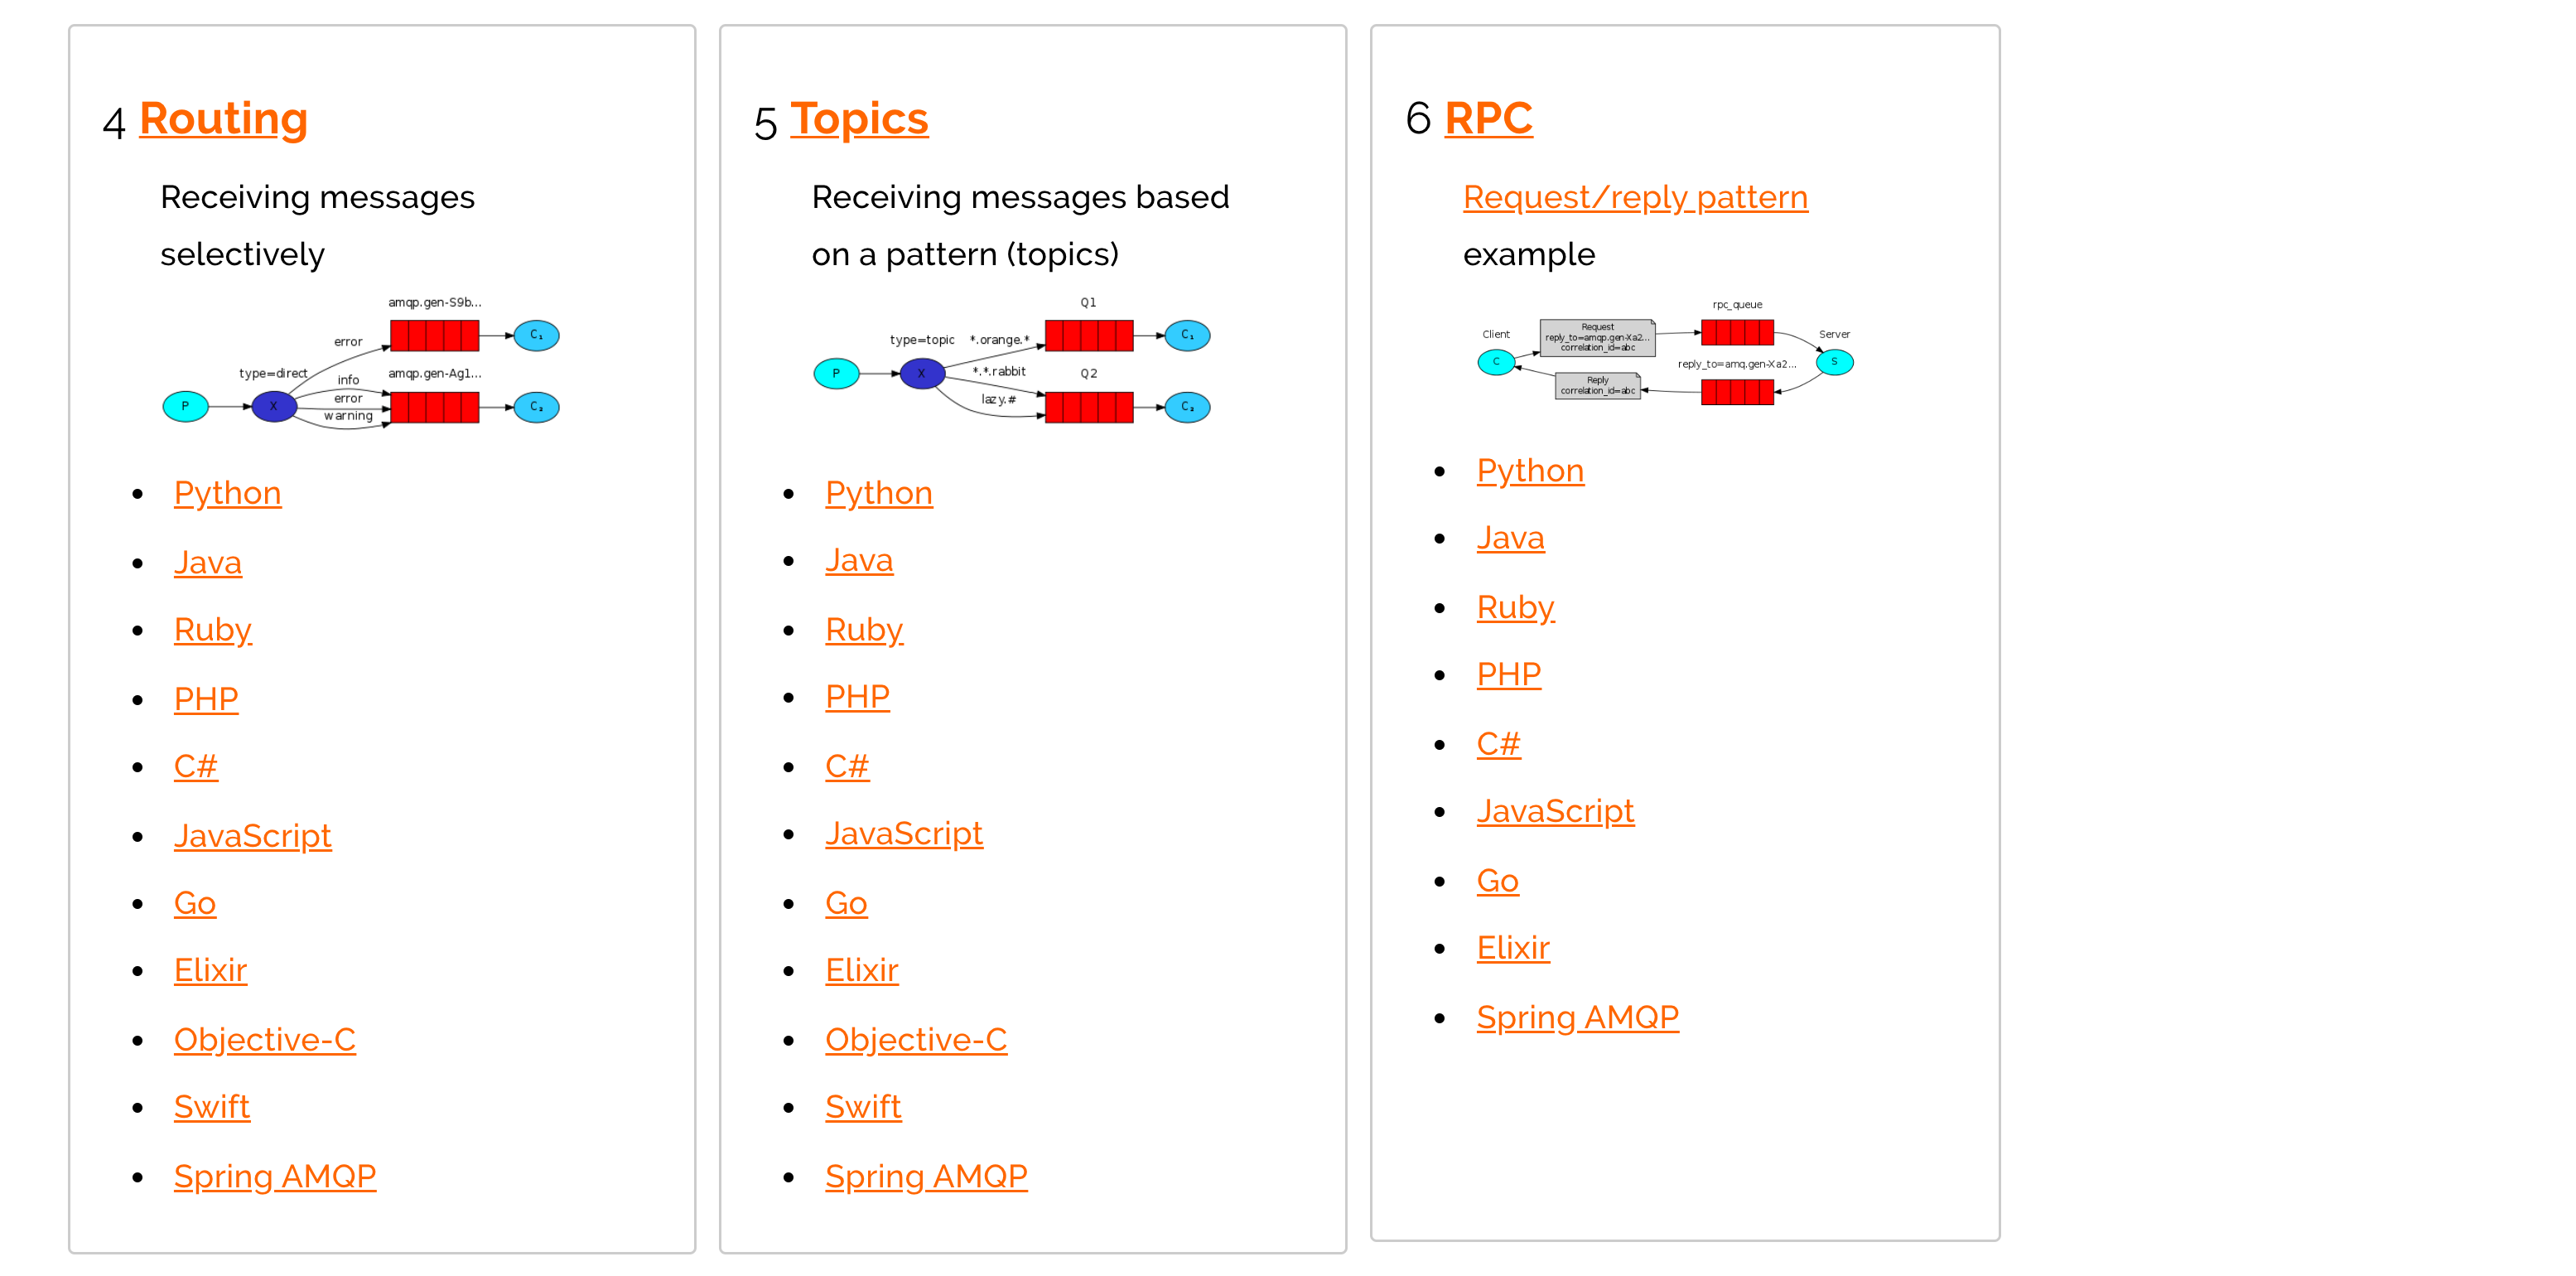
RabbitMQ支持的消息模型
引入依赖
<dependency>
    <groupId>com.rabbitmq</groupId>
    <artifactId>amqp-client</artifactId>
    <version>5.7.2</version>
</dependency>
第一种模型(直连)

在上图的模型中,有以下概念:
- P:生产者,也就是要发送消息的程序
- C:消费者:消息的接受者,会一直等待消息到来。
- queue:消息队列,图中红色部分。类似一个邮箱,可以缓存消息;生产者向其中投递消息,消费者从其中取出消息。
1. 开发生产者
public class Provider {
//生产消息
@Test
public void testSendMessage() throws IOException, TimeoutException {
//创建连接mq的连接工厂对象
ConnectionFactory connectionFactory = new ConnectionFactory();
//设置连接rabbitmq主机
connectionFactory.setHost("124.71.207.241");
//设置端口号
/**
* 注:RabbitMq的默认链接端口是5672(服务器要放开该端口,安全组配置)
* web访问默认端口是15672
* */
connectionFactory.setPort(5672);
//设置连接那个虚拟主机
connectionFactory.setVirtualHost("ems");
//设置访问虚拟主机的用户名和密码
connectionFactory.setUsername("ems");
connectionFactory.setPassword("123");
//获取连接对象
Connection connection = connectionFactory.newConnection();
//通过工具类获取连接对象
//Connection connection = RabbitMQUtils.getConnection();
//获取连接中通道
Channel channel = connection.createChannel();
//通道绑定对应消息队列
//参数1: 队列名称 如果队列不存在自动创建
//参数2: 用来定义队列特性是否要持久化 true 持久化队列(队列不会随Mq服务的重启而消失) false 不持久化
//参数3: exclusive 是否独占队列 true 独占队列(其他通道无法绑定该队列) false 不独占
//参数4: autoDelete: 是否在消费完成后自动删除队列 true 自动删除 false 不自动删除
//参数5: 额外附加参数
channel.queueDeclare("hello",false,false,false,null);
//发布消息
//参数1: 交换机名称 参数2:队列名称 参数3:传递消息额外设置 参数4:消息的具体内容
channel.basicPublish("","hello", null,"hello rabbitmq".getBytes());
channel.close();
connection.close();
//调用工具类 //RabbitMQUtils.closeConnectionAndChanel(channel,connection);
}
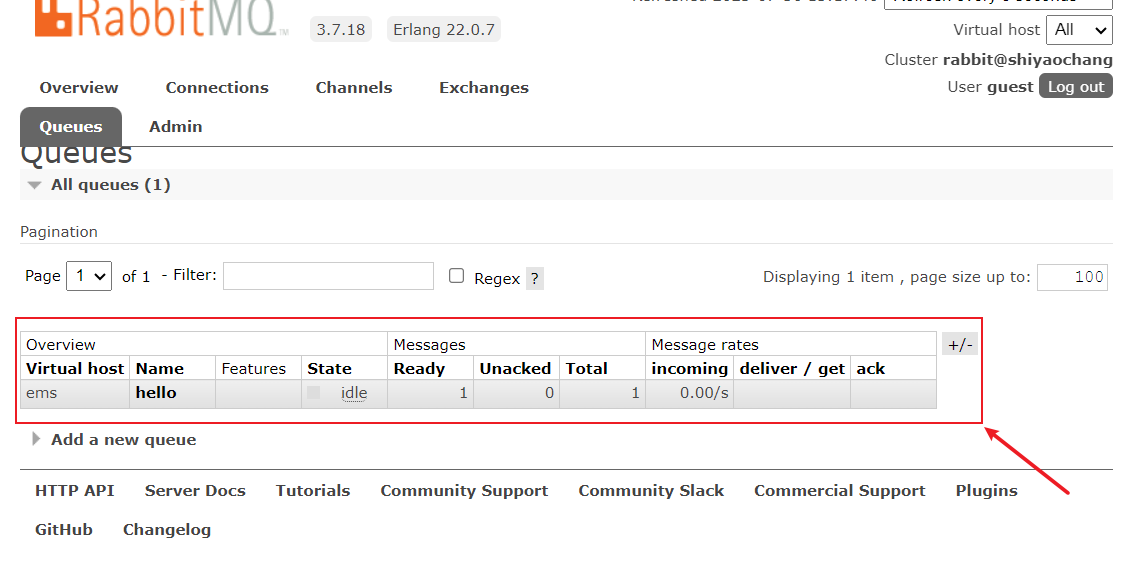
}运行生产者程序Provider,就可以在web管理界面发现队列中多了一条:
2. 开发消费者
public class Customer {

    public static void main(String[] args) throws IOException, TimeoutException {
        //创建连接工厂
        ConnectionFactory connectionFactory = new ConnectionFactory();
        connectionFactory.setHost("124.71.207.241");
        connectionFactory.setPort(5672);
        connectionFactory.setVirtualHost("ems");
        connectionFactory.setUsername("ems");
        connectionFactory.setPassword("123");
        //创建连接对象
        Connection connection = connectionFactory.newConnection();
        //通过工具类获取连接
        //Connection connection = RabbitMQUtils.getConnection();
        //创建通道
        Channel channel = connection.createChannel();


        //通道绑定队列
        // 注意:绑定时的参数要和生产者绑定时的参数一致
       channel.queueDeclare("hello",false,false,false,null);


        //消费消息
        //参数1: 消费那个队列的消息 队列名称
        //参数2: 开始消息的自动确认机制
        //参数3: 消费时的回调接口
        channel.basicConsume("hello",true,
            new DefaultConsumer(channel){
            @Override //最后一个参数: 消息队列中取出的消息
            public void handleDelivery(String consumerTag, Envelope envelope, AMQP.BasicProperties properties, byte[] body) throws IOException {
                System.out.println("===================================="+new String(body));
            }
        }
        );
    }
}
控制台输出取到的内容:
SLF4J: Failed to load class "org.slf4j.impl.StaticLoggerBinder".
SLF4J: Defaulting to no-operation (NOP) logger implementation
SLF4J: See http://www.slf4j.org/codes.html#StaticLoggerBinder for further details.

====================================hello rabbitmq

可以看出这个队列中的消息已被消费↑
为了方便创建链接对象,可以写一个工具类:
public class RabbitMQUtils {

    private static ConnectionFactory connectionFactory;
    private static Properties properties;
    static{
        //重量级资源  类加载执行之执行一次
        connectionFactory = new ConnectionFactory();
        connectionFactory.setHost("124.71.207.241");
        connectionFactory.setPort(5672);
        connectionFactory.setVirtualHost("ems");
        connectionFactory.setUsername("ems");
        connectionFactory.setPassword("123");

    }

    //定义提供连接对象的方法
    public static Connection getConnection() {
        try {
            return connectionFactory.newConnection();
        } catch (Exception e) {
            e.printStackTrace();
        }
        return null;
    }

    //关闭通道和关闭连接工具方法
    public static void closeConnectionAndChanel(Channel channel, Connection conn) {
        try {
            if(channel!=null) channel.close();
            if(conn!=null)   conn.close();
        } catch (Exception e) {
            e.printStackTrace();

        }
    }

    public static void main(String[] args) {
        //System.out.println("RabbitMQUtils.getConnection() = " + RabbitMQUtils.getConnection());
    }
}
第二种模型(work quene)
Work queues,也被称为(Task queues),任务模型。当消息处理比较耗时的时候,可能生产消息的速度会远远大于消息的消费速度。长此以往,消息就会堆积越来越多,无法及时处理。此时就可以使用work 模型:让多个消费者绑定到一个队列,共同消费队列中的消息。队列中的消息一旦消费,就会消失,因此任务是不会被重复执行的。

角色:
- P:生产者:任务的发布者
- C1:消费者-1,领取任务并且完成任务,假设完成速度较慢
- C2:消费者-2:领取任务并完成任务,假设完成速度快
1. 开发生产者
public class Provider {
    public static void main(String[] args) throws IOException {
        //获取连接对象
        Connection connection = RabbitMQUtils.getConnection();
        //获取通道对象
        Channel channel = connection.createChannel();

        //通过通道声明队列
        channel.queueDeclare("work", true, false, false, null);

        for (int i = 1; i <=20; i++) {
            //生产消息
            channel.basicPublish("", "work", null, (i + "hello work quene").getBytes());
        }

        //关闭资源
        RabbitMQUtils.closeConnectionAndChanel(channel, connection);

    }
}
2.开发消费者-1
消费的慢
public class Customer1 {
    public static void main(String[] args) throws IOException {

        //获取连接
        Connection connection = RabbitMQUtils.getConnection();
        final Channel channel = connection.createChannel();
        //channel.basicQos(1);//每一次只能消费一个消息
        channel.queueDeclare("work",true,false,false,null);
        //参数1:队列名称  参数2:消息自动确认 true  消费者自动向rabbitmq确认消息消费  false 不会自动确认消息
        channel.basicConsume("work",true,new DefaultConsumer(channel){
            @Override
            public void handleDelivery(String consumerTag, Envelope envelope, AMQP.BasicProperties properties, byte[] body) throws IOException {
                try{
                    Thread.sleep(2000);
                }catch (Exception e){
                    e.printStackTrace();
                }
                System.out.println("消费者-1: "+new String(body));
                // 参数1:确认队列中那个具体消息 参数2:是否开启多个消息同时确实
                //channel.basicAck(envelope.getDeliveryTag(),false);
            }
        });


    }
}
3.开发消费者-2
public class Customer2 {
    public static void main(String[] args) throws IOException {

        //获取连接
        Connection connection = RabbitMQUtils.getConnection();
        final Channel channel = connection.createChannel();
        channel.queueDeclare("work",true,false,false,null);

        channel.basicConsume("work",true,new DefaultConsumer(channel){
            @Override
            public void handleDelivery(String consumerTag, Envelope envelope, AMQP.BasicProperties properties, byte[] body) throws IOException {
                System.out.println("消费者-2: "+new String(body));
                //手动确认  参数1:手动确认消息标识  参数2:false 每次确认一个
                //channel.basicAck(envelope.getDeliveryTag(), false);
            }
        });

    }
}
4.测试结果
先启动两个消费者,在启动生产者
Customer1:
SLF4J: Failed to load class "org.slf4j.impl.StaticLoggerBinder".
SLF4J: Defaulting to no-operation (NOP) logger implementation
SLF4J: See http://www.slf4j.org/codes.html#StaticLoggerBinder for further details.
消费者-1: 2hello work quene
消费者-1: 4hello work quene
消费者-1: 6hello work quene
消费者-1: 8hello work quene
消费者-1: 10hello work quene
消费者-1: 12hello work quene
消费者-1: 14hello work quene
消费者-1: 16hello work quene
消费者-1: 18hello work quene
消费者-1: 20hello work quene
Customer2:
消费者-2: 1hello work quene
消费者-2: 3hello work quene
消费者-2: 5hello work quene
消费者-2: 7hello work quene
消费者-2: 9hello work quene
消费者-2: 11hello work quene
消费者-2: 13hello work quene
消费者-2: 15hello work quene
消费者-2: 17hello work quene
消费者-2: 19hello work quene
从管理界面可以看出所有消息已经被消费调:
| Overview | Messages | Message rates | +/- | ||||||
|---|---|---|---|---|---|---|---|---|---|
| Virtual host | Name | Features | State | Ready | Unacked | Total | incoming | deliver / get | ack |
| ems | work | D | idle | 0 | 0 | 0.00/s |
总结:默认情况下,RabbitMQ将按顺序将每个消息发送给下一个使用者。平均而言,每个消费者都会收到相同数量的消息。这种分发消息的方式称为循环。
5.消息自动确认机制
Doing a task can take a few seconds. You may wonder what happens if one of the consumers starts a long task and dies with it only partly done. With our current code, once RabbitMQ delivers a message to the consumer it immediately marks it for deletion. In this case, if you kill a worker we will lose the message it was just processing. We’ll also lose all the messages that were dispatched to this particular worker but were not yet handled.
But we don’t want to lose any tasks. If a worker dies, we’d like the task to be delivered to another worker.
完成一项任务可能需要几秒钟。您可能想知道,如果其中一个消费者启动了一个长任务,并且只完成了一部分就结束了,会发生什么。在我们当前的代码中,一旦RabbitMQ将消息传递给消费者,它会立即将其标记为删除(自动确认)。在这种情况下,如果杀死一个消费者,我们将丢失它正在处理的消息。我们还会丢失所有发送给这个特定消费者但尚未处理的消息。
如果关闭消费者的消息自动确认机制:
//参数1:队列名称  参数2:消息自动确认 true  消费者自动向rabbitmq确认消息消费  false 不会自动确认消息
  channel.basicConsume("work",false,new DefaultConsumer(channel)
重新执行消费者和生产者:当消费者消费完,消息还在
| Overview | Messages | Message rates | +/- | ||||||
|---|---|---|---|---|---|---|---|---|---|
| Virtual host | Name | Features | State | Ready | Unacked | Total | incoming | deliver / get | ack |
| ems | work | D | idle | 20 | 0 | 20 | 0.00/s | 0.00/s | 0.00/s |
在关闭自动确认后,开启消费者手动确认:
 // 参数1:确认队列中那个具体消息 参数2:是否开启多个消息同时确实
channel.basicAck(envelope.getDeliveryTag(),false);
在执行一次:队列中的消息被确认了
| Overview | Messages | Message rates | +/- | ||||||
|---|---|---|---|---|---|---|---|---|---|
| Virtual host | Name | Features | State | Ready | Unacked | Total | incoming | deliver / get | ack |
| ems | work | D | idle | 0 | 0 | 0 | 0.00/s | 0.00/s | 0.00/s |
为了体现能者多劳(消费的慢的消费者让它少消费几个),可以在消费者设置每次消费的个数:
如:上述 “开发消费者-1”每两秒消费一个,太慢了,让他一次只能消费一个
channel.basicQos(1);//每一次只能消费一个消息重新执行:消费者1只消费了一个
Customer1:
SLF4J: Failed to load class "org.slf4j.impl.StaticLoggerBinder".
SLF4J: Defaulting to no-operation (NOP) logger implementation
SLF4J: See http://www.slf4j.org/codes.html#StaticLoggerBinder for further details.

消费者-1: 1hello work quene
Customer2:
SLF4J: Failed to load class "org.slf4j.impl.StaticLoggerBinder".
SLF4J: Defaulting to no-operation (NOP) logger implementation
SLF4J: See http://www.slf4j.org/codes.html#StaticLoggerBinder for further details.

消费者-2: 2hello work quene
消费者-2: 3hello work quene
消费者-2: 4hello work quene
消费者-2: 5hello work quene
消费者-2: 6hello work quene
消费者-2: 7hello work quene
消费者-2: 8hello work quene
消费者-2: 9hello work quene
消费者-2: 10hello work quene
消费者-2: 11hello work quene
消费者-2: 12hello work quene
消费者-2: 13hello work quene
消费者-2: 14hello work quene
消费者-2: 15hello work quene
消费者-2: 16hello work quene
消费者-2: 17hello work quene
消费者-2: 18hello work quene
消费者-2: 19hello work quene
消费者-2: 20hello work quene
第三种模型(fanout)
fanout 扇出 也称为广播

在广播模式下,消息发送流程是这样的:
- 可以有多个消费者
- 每个消费者有自己的queue(队列)
- 每个队列都要绑定到Exchange(交换机)
- 生产者发送的消息,只能发送到交换机,交换机来决定要发给哪个队列,生产者无法决定。
- 交换机把消息发送给绑定过的所有队列
- 队列的消费者都能拿到消息。实现一条消息被多个消费者消费
1. 开发生产者
public class Provider {

    public static void main(String[] args) throws IOException {
        //获取连接对象
        Connection connection = RabbitMQUtils.getConnection();
        Channel channel = connection.createChannel();
        //将通道声明指定交换机   //参数1: 交换机名称    参数2: 交换机类型  fanout 广播类型
        channel.exchangeDeclare("logs","fanout");
        //发送消息
        //参数1: 交换机名称 参数2:队列名称(此处不用声明)  参数3:传递消息额外设置  参数4:消息的具体内容
        channel.basicPublish("logs","",null,"fanout type message".getBytes());
        //释放资源
        RabbitMQUtils.closeConnectionAndChanel(channel,connection);

    }
}
2. 开发消费者-1
public class Customer1 {
    public static void main(String[] args) throws IOException {
        //获取连接对象
        Connection connection = RabbitMQUtils.getConnection();
        Channel channel = connection.createChannel();
        //通道绑定交换机
        channel.exchangeDeclare("logs","fanout");
        //临时队列
        String queueName = channel.queueDeclare().getQueue();
        //绑定交换机和队列
        channel.queueBind(queueName,"logs","");
        //消费消息
        channel.basicConsume(queueName,true,new DefaultConsumer(channel){
            @Override
            public void handleDelivery(String consumerTag, Envelope envelope, AMQP.BasicProperties properties, byte[] body) throws IOException {
                System.out.println("消费者1: "+new String(body));
            }
        });
    }
}
3. 开发消费者-2
public class Customer2 {
    public static void main(String[] args) throws IOException {
        //获取连接对象
        Connection connection = RabbitMQUtils.getConnection();
        Channel channel = connection.createChannel();
        //通道绑定交换机
        channel.exchangeDeclare("logs","fanout");
        //临时队列
        String queueName = channel.queueDeclare().getQueue();
        //绑定交换机和队列
        channel.queueBind(queueName,"logs","");
        //消费消息
        channel.basicConsume(queueName,true,new DefaultConsumer(channel){
            @Override
            public void handleDelivery(String consumerTag, Envelope envelope, AMQP.BasicProperties properties, byte[] body) throws IOException {
                System.out.println("消费者2: "+new String(body));
            }
        });
    }
}
4.开发消费者-3
public class Customer3 {
    public static void main(String[] args) throws IOException {
        //获取连接对象
        Connection connection = RabbitMQUtils.getConnection();
        Channel channel = connection.createChannel();
        //通道绑定交换机
        channel.exchangeDeclare("logs","fanout");
        //临时队列
        String queueName = channel.queueDeclare().getQueue();
        //绑定交换机和队列
        channel.queueBind(queueName,"logs","");
        //消费消息
        channel.basicConsume(queueName,true,new DefaultConsumer(channel){
            @Override
            public void handleDelivery(String consumerTag, Envelope envelope, AMQP.BasicProperties properties, byte[] body) throws IOException {
                System.out.println("消费者3: "+new String(body));
            }
        });
    }
}
5. 测试结果
先启动消费者,在启动生产者
可以在web管理界面查看交换机

Customer1:
SLF4J: Failed to load class "org.slf4j.impl.StaticLoggerBinder".
SLF4J: Defaulting to no-operation (NOP) logger implementation
SLF4J: See http://www.slf4j.org/codes.html#StaticLoggerBinder for further details.

消费者1: fanout type message
Customer2:
SLF4J: Failed to load class "org.slf4j.impl.StaticLoggerBinder".
SLF4J: Defaulting to no-operation (NOP) logger implementation
SLF4J: See http://www.slf4j.org/codes.html#StaticLoggerBinder for further details.

消费者2: fanout type message
Customer3:
SLF4J: Failed to load class "org.slf4j.impl.StaticLoggerBinder".
SLF4J: Defaulting to no-operation (NOP) logger implementation
SLF4J: See http://www.slf4j.org/codes.html#StaticLoggerBinder for further details.

消费者3: fanout type message
第四种模型(Routing)
Routing 之订阅模型-Direct(直连)
在Fanout模式中,一条消息,会被所有订阅的队列都消费。但是,在某些场景下,我们希望不同的消息被不同的队列消费。这时就要用到Direct类型的Exchange。
在Direct模型下:
- 队列与交换机的绑定,不能是任意绑定了,而是要指定一个
RoutingKey(路由key) - 消息的发送方在 向 Exchange发送消息时,也必须指定消息的
RoutingKey。 - Exchange不再把消息交给每一个绑定的队列,而是根据消息的
Routing Key进行判断,只有队列的Routingkey与消息的Routing key完全一致,才会接收到消息
流程:

图解:
- P:生产者,向Exchange发送消息,发送消息时,会指定一个routing key。
- X:Exchange(交换机),接收生产者的消息,然后把消息递交给 与routing key完全匹配的队列
- C1:消费者,其所在队列指定了需要routing key 为 error 的消息
- C2:消费者,其所在队列指定了需要routing key 为 info、error、warning 的消息
1. 开发生产者
public class Provider {
    public static void main(String[] args) throws IOException {
        //获取连接对象
        Connection connection = RabbitMQUtils.getConnection();
        //获取连接通道对象
        Channel channel = connection.createChannel();
        String exchangeName = "logs_direct";
        //通过通道声明交换机  参数1:交换机名称  参数2:direct  路由模式
        channel.exchangeDeclare(exchangeName,"direct");
        //发送消息
        String routingkey = "info";
        channel.basicPublish(exchangeName,routingkey,null,("这是direct模型发布的基于route key: ["+routingkey+"] 发送的消息").getBytes());

        //关闭资源
        RabbitMQUtils.closeConnectionAndChanel(channel,connection);
    }
}
2.开发消费者-1
public class Customer1 {
    public static void main(String[] args) throws IOException {
        Connection connection = RabbitMQUtils.getConnection();
        Channel channel = connection.createChannel();
        String exchangeName = "logs_direct";
        //通道声明交换机以及交换的类型
        channel.exchangeDeclare(exchangeName,"direct");
        //创建一个临时队列
        String queue = channel.queueDeclare().getQueue();
        //基于route key绑定队列和交换机
        channel.queueBind(queue,exchangeName,"error");
        //获取消费的消息
        channel.basicConsume(queue,true,new DefaultConsumer(channel){
            @Override
            public void handleDelivery(String consumerTag, Envelope envelope, AMQP.BasicProperties properties, byte[] body) throws IOException {
                System.out.println("消费者1: "+ new String(body));
            }
        });

    }
}
3.开发消费者-2
public class Customer2 {
    public static void main(String[] args) throws IOException {
        Connection connection = RabbitMQUtils.getConnection();
        Channel channel = connection.createChannel();
        String exchangeName = "logs_direct";
        //声明交换机 以及交换机类型 direct
        channel.exchangeDeclare(exchangeName,"direct");
        //创建一个临时队列
        String queue = channel.queueDeclare().getQueue();
        //临时队列和交换机绑定
        channel.queueBind(queue,exchangeName,"info");
        channel.queueBind(queue,exchangeName,"error");
        channel.queueBind(queue,exchangeName,"warning");
        //消费消息
        channel.basicConsume(queue,true,new DefaultConsumer(channel){
            @Override
            public void handleDelivery(String consumerTag, Envelope envelope, AMQP.BasicProperties properties, byte[] body) throws IOException {
                System.out.println("消费者2: "+new String(body));
            }
        });

    }
}
4.测试结果
先启动消费者,在启动生产者,测试生产者发送Route key为info的消息时
Customer1:
SLF4J: Failed to load class "org.slf4j.impl.StaticLoggerBinder".
SLF4J: Defaulting to no-operation (NOP) logger implementation
SLF4J: See http://www.slf4j.org/codes.html#StaticLoggerBinder for further details.
Customer2:
SLF4J: Failed to load class "org.slf4j.impl.StaticLoggerBinder".
SLF4J: Defaulting to no-operation (NOP) logger implementation
SLF4J: See http://www.slf4j.org/codes.html#StaticLoggerBinder for further details.

消费者2: 这是direct模型发布的基于route key: [info] 发送的消息可以看出因为 消费者2和生产者有一样的routingkey,所以消费到了消息
Routing 之订阅模型-Topic
Topic类型的Exchange与Direct相比,都是可以根据RoutingKey把消息路由到不同的队列。只不过Topic类型Exchange可以让队列在绑定Routing key 的时候使用通配符!这种模型Routingkey 一般都是由一个或多个单词组成,多个单词之间以”.”分割,例如: item.insert

# 统配符
		* (star) can substitute for exactly one word.    匹配不多不少恰好1个词
		     如:user.*  == user.save , user.delete ,user.info 等等
		# (hash) can substitute for zero or more words.  匹配一个或多个词
		     如:user.#  == user.save , user.delete.save 等等
# 如:
		audit.#    匹配audit.irs.corporate或者 audit.irs 等
    audit.*   只能匹配 audit.irs
1.开发生产者
public class Provider {
    public static void main(String[] args) throws IOException {
        //获取连接对象
        Connection connection = RabbitMQUtils.getConnection();
        Channel channel = connection.createChannel();
        //声明交换机以及交换机类型 topic
        channel.exchangeDeclare("topics","topic");
        //发布消息
        String routekey = "save.user.delete";
        channel.basicPublish("topics",routekey,null,("这里是topic动态路由模型,routekey: ["+routekey+"]").getBytes());
        //关闭资源
        RabbitMQUtils.closeConnectionAndChanel(channel,connection);

    }
}
2.开发消费者-1
Routing Key中使用*通配符方式
public class Customer1 {
    public static void main(String[] args) throws IOException {
        //获取连接
        Connection connection = RabbitMQUtils.getConnection();
        Channel channel = connection.createChannel();
        //声明交换机以及交换机类型
        channel.exchangeDeclare("topics","topic");
        //创建一个临时队列
        String queue = channel.queueDeclare().getQueue();
        //绑定队列和交换机  动态统配符形式route key
        channel.queueBind(queue,"topics","*.user.*");
        //消费消息
        channel.basicConsume(queue,true,new DefaultConsumer(channel){
            @Override
            public void handleDelivery(String consumerTag, Envelope envelope, AMQP.BasicProperties properties, byte[] body) throws IOException {
                System.out.println("消费者1: "+ new String(body));
            }
        });
    }
}
3.开发消费者-2
Routing Key中使用#通配符方式
public class Customer2 {
    public static void main(String[] args) throws IOException {
        //获取连接
        Connection connection = RabbitMQUtils.getConnection();
        Channel channel = connection.createChannel();
        //声明交换机以及交换机类型
        channel.exchangeDeclare("topics","topic");
        //创建一个临时队列
        String queue = channel.queueDeclare().getQueue();
        //绑定队列和交换机  动态统配符形式route key
        channel.queueBind(queue,"topics","*.user.#");
        //消费消息
        channel.basicConsume(queue,true,new DefaultConsumer(channel){
            @Override
            public void handleDelivery(String consumerTag, Envelope envelope, AMQP.BasicProperties properties, byte[] body) throws IOException {
                System.out.println("消费者2: "+ new String(body));
            }
        });
    }
}
4.测试结果
先启动消费者,在启动生产者
Customer1:
SLF4J: Failed to load class "org.slf4j.impl.StaticLoggerBinder".
SLF4J: Defaulting to no-operation (NOP) logger implementation
SLF4J: See http://www.slf4j.org/codes.html#StaticLoggerBinder for further details.

消费者1: 这里是topic动态路由模型,routekey: [save.user.delete]
Customer2:
SLF4J: Failed to load class "org.slf4j.impl.StaticLoggerBinder".
SLF4J: Defaulting to no-operation (NOP) logger implementation
SLF4J: See http://www.slf4j.org/codes.html#StaticLoggerBinder for further details.

消费者2: 这里是topic动态路由模型,routekey: [save.user.delete]


- Post link: http://sovzn.github.io/2023/07/29/RabbitMQ/
- Copyright Notice: All articles in this blog are licensed under unless otherwise stated.
若没有本文 Issue,您可以使用 Comment 模版新建。
GitHub Issues